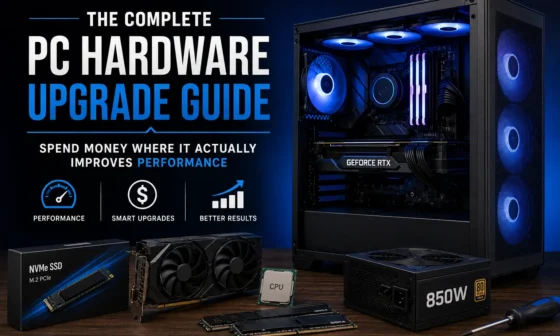
Fast hardware is only useful when it can stay fast. A PC with poor airflow, a weak cooling path, unstable power delivery, or chaotic fan control can feel worse than its parts list suggests. It may start quietly and become loud, launch a game smoothly and then stutter, or pass a short test while failing during a long workload. That is why airflow, cooling, and power planning deserve the same attention as the CPU and GPU.
This guide explains how to think about the physical side of performance: fresh air, exhaust paths, fan selection, CPU and GPU cooling, thermal paste, power-supply quality, cable routing, noise control, dust management, and real-world testing. If you are still deciding which component to upgrade first, start with our complete PC hardware upgrade guide. If your cooling or power changes involve a new motherboard, DDR5 memory, or NVMe layout, the motherboard, DDR5 and NVMe compatibility guide will help you avoid platform mistakes.
The aim is not to create a louder system with more fans. The aim is to build a predictable machine that moves heat out efficiently, keeps power stable, protects expensive components, and remains comfortable to use every day.
Cooling and Power Troubleshooting Map
Use the table below to connect symptoms with the first place to inspect. It is not a substitute for testing, but it prevents the common mistake of replacing parts before understanding the behavior.
| Problem | Most Useful First Check | Possible Fix |
|---|---|---|
| Fans surge loudly during light tasks | Fan curve tied to a spiky sensor | Smooth the curve or add response delay. |
| GPU gets hot despite many case fans | Card clearance and intake path | Improve fresh air to GPU or adjust fan layout. |
| CPU temperature jumps instantly | Cooler mount, paste, pump or cooler capacity | Remount cooler and verify cooler operation. |
| Temperatures rise slowly over time | Case airflow or dust buildup | Clean filters and improve intake/exhaust path. |
| Random crashes under heavy GPU load | PSU quality, connectors, cable seating | Inspect power delivery and connector support. |
| PC is cool but still annoying | Vibration, turbulence, fan quality | Identify noise source and tune or isolate it. |
Think of Heat as a Performance Variable
Heat is not only a comfort issue; it changes how long hardware can maintain its intended behavior and how aggressively fans must work to keep the system under control. Cooling and power decisions feel secondary until a system becomes loud, unstable, or inconsistent. A PC that is fast for the first few minutes and then becomes noisy, inconsistent, or unstable is often telling you that its cooling system is not keeping up with sustained load. The best hardware setup is not the one that looks the most aggressive in a product photo; it is the one that keeps clocks, voltage, and temperatures predictable during ordinary use.
The first useful step is observation rather than replacement. Compare temperatures at idle, during a short burst, and after a longer workload; listen for sudden fan ramps; note whether the room is warm; and watch whether clock speeds drop as heat rises. A few notes taken during a gaming session, rendering job, file transfer, or warm afternoon can explain whether the issue is airflow, fan behavior, dust, poor contact, case restriction, power delivery, or unrealistic expectations.
Good decisions come from linking cause to cure. If performance declines as temperatures climb, improve contact, airflow, fan curves, or cooler capacity before assuming the CPU or GPU is too weak. Adding more fans will not fix a badly mounted cooler, a premium power supply will not correct a blocked front panel, and a large case will not help if cables and fan curves fight the intended airflow path.
Most mistakes are simple, which is why they are easy to miss. Many users replace the main component while leaving the same restricted case, dust-packed filters, or poor cooler mount that caused the old part to struggle. Treat the case, fans, coolers, graphics card, power supply, and room environment as one system. Treat cooling as part of performance, not as decoration.
- Measure temperatures during sustained work.
- Watch noise and clock behavior together.
- Fix airflow before blaming the component.
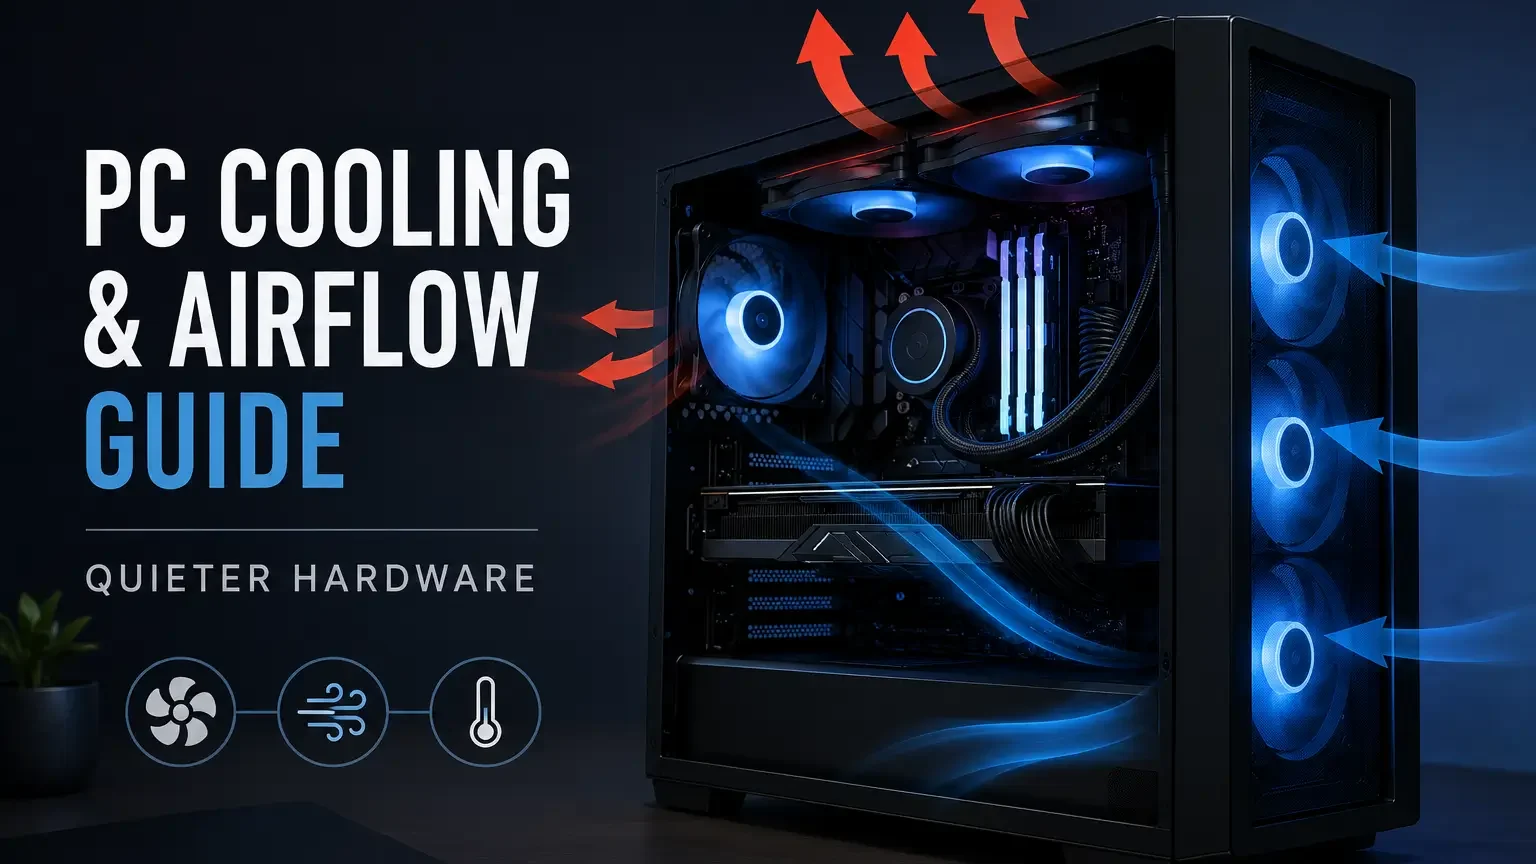
Understand the Basic Airflow Path
A case needs a simple path for cool air to enter, pass over hot components, and leave before it recirculates inside the chassis. The most common layout uses front or bottom intake and rear or top exhaust, but the exact design depends on the case, GPU style, CPU cooler, radiator placement, and desk environment.
Identify every intake and exhaust point, check whether filters are blocked, follow where GPU heat goes, and see whether cables or drive cages interrupt the air path.
Build airflow around the parts that produce the most heat rather than placing fans wherever a mount exists.
A case filled with fans can still cool poorly if intake air is blocked by glass, if exhaust fights the CPU cooler, or if the GPU keeps recycling its own warm air. Airflow is direction plus clearance, not fan count alone.
- Map intake and exhaust before buying fans.
- Keep the GPU supplied with fresh air.
- Avoid fan layouts that push against each other.
Balance Intake, Exhaust and Dust Control
Positive, negative, and neutral pressure describe how air tends to move through the case, and each approach affects dust buildup, temperature, and noise. Slight positive pressure is popular because filtered intake can reduce dust entering through random gaps, while excessive positive or negative pressure can create its own problems.
Look at the number and strength of intake and exhaust fans, whether intakes are filtered, where dust collects, and whether panels vibrate or whistle at higher speeds.
For most practical systems, use filtered intakes with a clear exhaust route and tune fan speeds so that airflow remains smooth instead of turbulent.
Chasing a perfect pressure label can distract from the real goal: enough fresh air for the CPU, GPU, motherboard, memory, storage, and power supply. Dust control and cooling work best when fan layout and maintenance habits support each other.
- Prefer filtered intake where dust is common.
- Clean filters before judging temperatures.
- Do not let pressure theory override actual results.
Choose Case Fans for the Job They Actually Do
Case fans differ in airflow, static pressure, bearing design, noise profile, size, thickness, connector type, and how they behave at low speeds. A fan pushing through a tight front filter or radiator faces a different job from a rear exhaust fan moving air through an open grille.
Check fan size support, filter restriction, radiator use, connector type, speed range, and whether the motherboard has enough controllable headers.
Use fans with stronger pressure characteristics for restrictive panels or radiators and quiet airflow-focused fans for open exhaust or low-resistance intake.
Buying the fastest fan often produces more noise than useful cooling, especially if the case path is restricted or the fan curve is too aggressive. A good fan choice is quiet at normal load and capable when the system gets warm.
- Match fan type to restriction level.
- Use PWM control when possible.
- Avoid mixing too many random fan curves.
Tune Fan Curves Before Replacing Hardware
Fan curves decide how quickly cooling responds to temperature changes, and poor curves can make a capable PC sound nervous or let heat build unnecessarily. A system that constantly revs up and down may not need new fans; it may need smoother response settings, better sensor choice, or a delay that ignores harmless short spikes.
Use motherboard firmware or trusted control software to inspect which sensor controls each fan, where the curve ramps, and how the system sounds during real use.
Set a quiet baseline for light work, a smooth middle range for gaming or creative loads, and a firm upper range for sustained heat without sudden jumps.
Tying every fan to a spiky CPU sensor can make the whole case surge during brief background tasks, while ignoring GPU temperature can leave the graphics card starving for fresh air. Fan tuning is one of the cheapest ways to improve comfort.
- Use gradual curves instead of sharp jumps.
- Control case fans with the most relevant heat source.
- Test with real workloads, not only idle temperatures.
Separate CPU Cooler Problems From Case Airflow Problems
A hot processor can be caused by weak case airflow, but it can also come from poor cooler contact, too little mounting pressure, dried paste, incorrect pump behavior, or a cooler that is simply undersized. Distinguishing these causes prevents you from buying a new case when the cooler mount is wrong or buying a cooler when the case cannot feed it cool air.
Compare CPU temperature with the side panel on and off, inspect cooler mounting, verify fan direction, confirm pump speed on liquid coolers, and check whether heat rises instantly or gradually.
Instant high temperatures suggest contact or cooler capacity; slow heat buildup that improves with the side panel removed suggests case airflow.
Many builders remount every part except the one causing the issue because the cooler appears installed correctly at a glance. The pattern of the temperature rise tells you where to look.
- Check mounting pressure and fan direction.
- Observe instant spikes versus gradual heat soak.
- Do not ignore pump or header settings on liquid coolers.
Pick the Right CPU Cooler for Noise and Sustained Load
A CPU cooler should match the processor, workload duration, case clearance, memory height, motherboard layout, and the noise level you can tolerate. A light office PC, gaming machine, compact workstation, and rendering box do not need the same cooler even if the socket is compatible.
Check cooler height, radiator support, memory clearance, socket hardware, thermal load, expected boost behavior, and whether the case provides enough fresh air.
Choose a cooler that can handle your sustained workload at comfortable fan speeds rather than one that only looks good in a short test.
Oversized coolers can block memory or side panels, while undersized coolers may force loud fans and unstable boost behavior. The best CPU cooler is the one that fits physically, cools predictably, and remains acceptable to live with.
- Measure cooler clearance before buying.
- Consider long workloads, not only short bursts.
- Check memory and motherboard clearance.
Respect GPU Cooling and Slot Clearance
Modern graphics cards often produce more heat than any other part in the system, and their cooling depends heavily on clearance around the fans and exhaust path. A GPU with excellent cooler hardware can still run hot if it sits against a solid panel, a lower expansion card, a power-supply shroud, or tangled cables.
Measure card length and thickness, check distance from intake fans, inspect vertical mount spacing, and watch GPU hotspot and fan behavior under load.
Choose a card and case combination that gives the GPU room to breathe, especially for long gaming sessions or GPU-accelerated creation work.
Vertical mounting can look clean but may harm cooling if the fans sit too close to glass; similarly, compact cases demand more careful fan planning. A graphics card upgrade should include a cooling plan, not only a power plan.
- Leave breathing room around GPU fans.
- Check card thickness and support brackets.
- Avoid vertical mounts that press fans against glass.
Use Thermal Paste Correctly Without Overthinking It
Thermal paste fills microscopic gaps between the cooler and processor heat spreader, but it cannot compensate for a bad mount, warped pressure, or an inadequate cooler. Most users need a clean surface, a reasonable amount of paste, even mounting pressure, and patience, not exotic techniques.
Clean old paste carefully, apply an appropriate amount, tighten the cooler evenly, and recheck temperatures after the first warm-up cycle.
Repaste when temperatures have worsened over time, after removing a cooler, or when a mount was clearly poor; do not repaste every week hoping for miracles.
Too little paste can leave gaps, too much can create mess, and repeated remounting can introduce more variables than it solves. Good paste application is simple; correct mounting matters even more.
- Clean surfaces before applying new paste.
- Tighten coolers evenly.
- Use temperature results to judge the mount.
Keep NVMe Drives, Memory and Motherboard Areas in Mind
Cooling conversations often focus on CPU and GPU temperatures, but storage drives, memory, voltage-regulation components, and chipset areas also live inside the same warm case. Fast NVMe drives can slow during long transfers if they overheat, and motherboard power-delivery areas can become warmer in cases with poor airflow.
Check whether M.2 drives have heatsinks, whether GPU heat blows across storage, whether top exhaust removes warm air, and whether memory receives some incidental airflow.
Use motherboard heatsinks when available, avoid burying hot drives under a GPU without airflow, and keep a modest case-air movement pattern even when the CPU and GPU seem fine.
A system can pass a short CPU test while still struggling during long file copies, game installs, or mixed workloads that heat several areas at once. Stable cooling protects the whole platform, not only the headline chips.
- Use M.2 heatsinks when appropriate.
- Avoid dead zones around storage and VRMs.
- Test mixed workloads, not only CPU or GPU alone.
Choose a Power Supply for Stability, Not Just Wattage
Power problems can look like random crashes, restarts, black screens, coil noise, or instability under sudden GPU load. A quality power supply is a foundation part because it must handle transient behavior, connector demands, efficiency, heat, and long-term reliability.
Check capacity, connector type, cable count, product quality, warranty, age, and whether the unit is suitable for the graphics card and processor combination.
Buy a reliable unit with enough headroom, modern connector support when needed, and a reputation for stable behavior rather than choosing the cheapest high-wattage label.
A low-quality unit can technically power on the PC yet become the hidden reason every heavy workload feels risky. Power stability is invisible when it works and unforgettable when it fails.
- Do not reuse unknown power supplies in expensive builds.
- Check connector requirements carefully.
- Leave practical headroom for future upgrades.
Understand Power Connectors and Cable Discipline
Power delivery is not only about the unit itself; cables, connectors, seating, bends, modular compatibility, and routing all affect safety and reliability. A clean build should make connectors easy to inspect and should avoid sharp bends or tension near high-power plugs.
Use only cables intended for the specific modular PSU, seat connectors fully, avoid forcing adapters, and leave room between the GPU connector and side panel.
Plan cable routing before final assembly so power cables do not block intake fans, press against glass, or pull on the graphics card.
Mixing modular cables from different power supplies can damage hardware, and a connector that appears close to seated may still cause serious problems. Cable discipline is part of electrical reliability.
- Never mix modular PSU cables unless verified compatible.
- Check high-power connectors visually and physically.
- Avoid tight bends at GPU power inputs.
Use Cable Management to Improve Serviceability
Cable management is often treated as appearance, but its real value is airflow clarity, easier cleaning, safer maintenance, and faster troubleshooting. A case does not need to look like a showcase build to be well managed; it needs cables kept away from fan blades, hot zones, and future service paths.
Look behind the motherboard tray, tie only what needs tying, avoid crushing cables, label unusual connections, and leave enough slack to remove panels comfortably.
Route cables so that the main airflow path is open and important connectors remain accessible after the build is complete.
Overtightening every cable can make upgrades harder and may stress connectors, while ignoring cables can block fans and collect dust. Good cable management is quiet, practical, and easy to work on later.
- Keep cables clear of fans.
- Do not overtighten ties around delicate cables.
- Leave access to storage and fan headers.
Control Noise Without Sacrificing Safety
A quiet PC is not created by simply slowing every fan; it comes from efficient heat transfer, smooth fan curves, good case airflow, and realistic expectations. Noise can come from fans, pumps, coil whine, vibrating panels, hard drives, turbulent grilles, or a graphics card working harder than necessary.
Listen with the side panel on and off, identify the loudest source, watch temperatures while reducing fan speed, and check for vibration against the desk or case panels.
Reduce noise by removing restrictions, tuning curves, using larger slower fans where possible, isolating vibration, and limiting unnecessary heat before cutting cooling too far.
Silencing fans without monitoring temperatures can create throttling or shorten comfort under sustained load. Quiet operation is a balance between airflow, acoustics, and thermal headroom.
- Find the noise source before buying replacements.
- Tune gradually while monitoring temperatures.
- Fix vibration and turbulence as well as fan speed.
Diagnose Thermal Throttling and Sudden Slowdowns
Thermal throttling happens when hardware reduces performance to stay within safe operating limits, and it often feels like sudden inconsistency rather than a simple lack of speed. The symptom may appear in long game sessions, rendering jobs, summer weather, dusty systems, compact cases, or laptops connected to demanding external displays.
Watch temperature, clock speed, power behavior, fan speed, and workload duration together; look for a repeated point where performance drops after heat builds.
If throttling is confirmed, improve cooling contact, airflow, fan behavior, dust control, or power settings before assuming the hardware is obsolete.
Users often chase driver fixes for what is actually a predictable heat pattern. A slowdown that arrives with temperature is a cooling problem until proven otherwise.
- Look for performance drops after heat soak.
- Compare short and long tests.
- Retest after cleaning and fan-curve changes.
Build a Maintenance Schedule That Prevents Problems
Cooling and power stability improve when maintenance is routine instead of emergency work done after a crash. Dust, clogged filters, loose cables, aging paste, fan bearing noise, and full storage drives slowly change how a PC behaves.
Inspect filters monthly in dusty rooms, clean the case gently, listen for new fan noises, check temperatures seasonally, and verify backups before major hardware work.
Create a maintenance rhythm that matches the environment; a pet-friendly carpeted room needs more attention than a clean office desk.
Waiting until temperatures are extreme can make troubleshooting harder because several small issues may have stacked together. A well-maintained PC ages more gracefully and upgrades more predictably.
- Clean filters before they become mats of dust.
- Check temperatures after seasonal room changes.
- Back up before opening the system for major work.
Design Cooling Differently for Small, Mid-Tower and Showcase Builds
Case size and design style change how cooling should be planned because component density, panel restriction, radiator location, and cable space vary widely. A compact PC demands careful part selection, a mid-tower rewards clean airflow, and a showcase case may need extra attention to prevent aesthetics from hurting thermals.
Measure clearances, identify intake restrictions, check radiator and GPU conflicts, and consider whether the system will sit under a desk, near a wall, or inside a cabinet.
In small builds, choose efficient parts and coolers first; in mid-towers, optimize airflow path; in glass-heavy cases, ensure the visible layout still feeds components fresh air.
Copying a fan layout from a different case can fail because the panel design and component positions are not the same. Cooling plans should be built for the case you own, not for a generic diagram.
- Compact builds need efficiency and clearance discipline.
- Mid-towers benefit from simple front-to-back flow.
- Showcase builds must not trap the GPU behind glass.
Connect Cooling and Power Planning to Future Upgrades
A good airflow and power foundation makes future upgrades less disruptive because the system already has headroom for stronger parts. If you plan to upgrade the GPU later, your case airflow, power supply, cable space, and fan headers should not be designed only for today’s low-heat setup.
Look at future GPU length, possible power connectors, radiator support, spare fan headers, and whether the case has room for additional storage or airflow changes.
Spend a little more on foundation parts when they will survive multiple upgrade cycles, but do not overbuild so much that the budget for current performance disappears.
Buying a barely adequate PSU or cramped case can force another purchase the moment the next major component is installed. Cooling and power are the upgrade path under the upgrade path.
- Leave room for a future GPU if that is part of the plan.
- Choose a PSU with practical headroom.
- Keep airflow flexible rather than locked into one fragile layout.
Use Real-World Testing Instead of Chasing Perfect Numbers
There is no single perfect temperature, fan speed, or noise level for every PC because ambient temperature, workload, case design, and personal tolerance differ. The goal is stable, safe, comfortable behavior in the tasks you actually run, not winning a screenshot contest.
Test the system in your normal room, with the side panels installed, during the games, applications, exports, or file transfers that matter.
If the PC stays stable, temperatures are reasonable, noise is acceptable, and performance remains consistent, the cooling and power setup is doing its job.
Endlessly chasing lower temperatures can create unnecessary noise, cost, and complexity without improving the experience. A practical PC is measured by consistency, not perfection.
- Test with panels closed and filters installed.
- Use your own workload as the final judge.
- Stop tuning when the system is stable and comfortable.
Do Not Ignore the Room Around the PC
The room is part of the cooling system because every fan can only move the air available around the case. A computer under a desk, inside a cabinet, beside a heater, on thick carpet, or against a wall may struggle even when the internal fan layout looks sensible.
Feel whether warm exhaust is collecting around the rear or top of the case, check how close the case sits to walls, and compare temperatures with the PC moved into open space.
If temperatures improve when the case has more breathing room, rearranging the desk may be more effective than buying another fan.
Builders sometimes tune the inside of the case for hours while the outside environment keeps feeding it warm air. Good airflow begins before air reaches the front panel.
- Keep exhaust areas clear.
- Avoid closed cabinets for high-heat systems.
- Raise the case off dusty carpet when possible.
Use Power Limits and Efficiency Settings Wisely
Performance tuning is not always about pushing hardware harder; sometimes a small reduction in power draw produces nearly the same user experience with less heat and noise. This matters for compact builds, warm rooms, quiet workstations, and systems where the graphics card or processor runs far beyond the point of efficient gains.
Observe power draw, temperatures, fan speed, and real workload performance before and after conservative power or voltage tuning.
If a small efficiency adjustment drops noise and heat without changing how the PC feels, it may be a better upgrade than buying more cooling hardware.
Random undervolting or power changes without stability testing can create crashes that look like driver or game problems. Efficiency tuning should be careful, measured, and reversible.
- Change one setting at a time.
- Keep notes of default values.
- Test stability with real workloads.
Know When Cooling Upgrades Are Not the Answer
Some issues look thermal because they happen during heavy use, but the real cause may be software, memory instability, a failing drive, a weak power supply, or an unrealistic graphics setting. A good diagnosis checks heat without assuming heat explains everything.
Look for error logs, memory errors, storage health warnings, driver crashes, power events, and whether the same issue appears at lower temperatures.
If temperatures are controlled and the problem remains, move the diagnosis toward memory, storage, power, firmware, or software rather than adding more fans.
Installing more cooling can hide the original question and make the system more complicated while the real fault continues. Cooling is critical, but it is one part of a larger stability picture.
- Confirm temperatures before buying parts.
- Check memory and storage health when crashes persist.
- Avoid turning every problem into a fan problem.
Frequently Asked Questions
How many case fans does a gaming PC need?
There is no universal number, but most balanced systems do well with a clear intake path and a clear exhaust path. Fan quality, case restriction, GPU heat, and fan curves matter more than simply filling every mount.
Is positive pressure better than negative pressure?
Slight positive pressure with filtered intake is often useful for dust control, but actual results depend on the case. Good airflow direction and regular cleaning matter more than chasing a perfect pressure label.
Should I use an air cooler or liquid cooler for my CPU?
Both can work well. Air coolers are simple and reliable, while liquid coolers can help in certain space or heat-density situations. Choose based on CPU heat, case support, noise goals, clearance, and maintenance comfort.
Can poor airflow reduce FPS?
Poor airflow can reduce sustained performance if CPU or GPU temperatures rise enough to cause throttling or aggressive fan behavior. It may not change every benchmark, but it can affect consistency during long sessions.
How do I know if my PSU is causing crashes?
Power-related crashes often occur under sudden heavy load, especially with demanding GPUs. Check connector seating, PSU quality, age, capacity, cable use, and whether the system is stable with lower power limits or different workloads.
How often should I clean my PC?
The right interval depends on the room. A dusty room, carpet, pets, or floor placement may require monthly filter checks, while a clean desk setup may need less frequent maintenance. Let dust buildup and temperature trends guide the schedule.
Advanced Cooling Strategy: Design the System as One Air Path
Airflow works best when the case behaves like a simple route instead of a collection of unrelated fans. Fresh air should enter from areas with filters or clear openings, pass through the zones that produce heat, and leave before it circles back into the same intakes. The graphics card, CPU cooler, power supply, storage area, and motherboard heatsinks all influence that route. A neat airflow design does not require the most fans; it requires fans that are placed where they can actually move useful air.
The easiest mistake is adding fans without asking what each one changes. A new intake may help a graphics card if it feeds the lower front of the case, but it may do little for a tower CPU cooler if the air cannot reach the heatsink path. A top exhaust can remove warm air efficiently, yet in some layouts it may steal cool air before it reaches the CPU cooler. This is why testing one change at a time is more valuable than filling every mounting point immediately.
Air pressure is a tool, not a religion. A slightly positive setup, where intake is stronger than exhaust, can help reduce dust through unfiltered gaps. A balanced setup can work well in cases with strong front ventilation and clear exhaust. A negative setup may move warm air quickly but can pull dust through every crack if filters are weak. The best pressure pattern depends on the case, the filters, the fan speeds, the desk location, and how often the owner is willing to clean.
Build Fan Curves Around Behavior, Not Fear
Many PCs are loud because the fan curves react too aggressively to short temperature spikes. Modern processors can jump in temperature quickly for brief tasks, and a nervous fan curve turns those normal bursts into constant noise changes. A smoother curve allows the cooler to absorb short spikes without immediately racing. The target is not the lowest possible temperature at every second; it is stable behavior that prevents throttling while keeping the room pleasant.
Use separate thinking for idle, mixed load, and sustained load. Idle fans should be quiet enough that the PC fades into the room. Mixed load should avoid sudden ramping during browsing, downloads, game menus, or light editing. Sustained load should protect performance during long sessions without sounding like an emergency. A curve that is excellent for a ten-minute benchmark may be unpleasant for a five-hour workday, so tune for the way the machine is used most often.
Graphics-card noise needs special attention because many GPUs produce most of the heat in a gaming system. Case intake aimed at the GPU can reduce how hard the card’s own fans must work. A frame-rate cap can also reduce heat without making the game feel worse, especially when the system is rendering far more frames than the monitor can display. Less waste heat often means lower noise, steadier clocks, and a more comfortable room.
Understand Heat Sources by Zone
The CPU zone depends on cooler contact, case airflow, power limits, workload type, and motherboard behavior. A tower air cooler wants a clean front-to-back path, while a liquid cooler depends on radiator placement, pump behavior, and fan speed through the radiator fins. If CPU temperatures are high with the side panel open, contact pressure, paste application, cooler capacity, or power settings may be the problem. If temperatures improve dramatically with the panel open, the case airflow path deserves attention.
The GPU zone is strongly affected by slot clearance and nearby obstacles. A thick graphics card can sit close to the power-supply shroud, a side glass panel, or another expansion card. When the card cannot breathe, its fans work harder and dump more heat into the case. A GPU that is technically compatible with the case can still be a poor practical fit if the intake path is blocked or the warm exhaust has nowhere to go.
Storage and motherboard zones are easy to ignore because they rarely make obvious noise. NVMe drives can slow down when they overheat, and motherboard power-delivery heatsinks rely on some movement of air across the board. Memory can also be affected by the warm pocket around the CPU socket and top of the graphics card. A quiet rear exhaust or gentle top airflow may protect these areas without changing the main CPU or GPU temperatures dramatically.
Power Stability and Cooling Are Connected
A power supply does more than provide a wattage number. It must handle load changes cleanly, deliver power through the right connectors, stay within safe temperature ranges, and operate without adding unnecessary noise. A unit mounted in a cramped compartment full of dust can become louder and less comfortable even if the system’s component temperatures look acceptable. Power stability begins with choosing a quality unit, but it continues with airflow, cable routing, and maintenance.
Transient load behavior matters when a system moves quickly from light work to a heavy game, render, or benchmark. The power supply and graphics-card cabling need enough headroom to handle those changes without voltage instability or protective shutdowns. Random black screens under load are not always caused by the GPU itself. They can also come from poor cables, overloaded adapters, aging power supplies, wall-power issues, or a combination of heat and power stress.
Cable discipline is partly electrical and partly mechanical. Use the correct cables for the power supply, avoid sharp bends near high-power connectors, and keep bundles from pressing into fans. Modular cables should not be swapped between unrelated power-supply models because connector shapes do not guarantee matching pin layouts. A clean build is easier to inspect, easier to cool, and safer to service later.
Cooling for Different Case Styles
A mesh-front mid tower is usually the easiest environment for balanced cooling because it provides a direct intake path and enough space for large air coolers or radiators. The main task is to avoid overcomplicating it. Two or three front intakes and a sensible exhaust can be enough for many systems. Adding more fans may reduce temperatures slightly, but the benefit often fades once the main hot zones already receive fresh air.
A glass-front or showcase case may need a more careful approach because visual design can restrict intake. Side intakes, bottom intakes, or higher fan speeds may be required to compensate. These cases can still work well, but buyers should not assume that the number of fan mounts tells the whole story. The size and openness of the actual air openings matter more than the marketing photo.
Small-form-factor builds reward efficiency and patience. Every cable, panel, riser, dust filter, and cooler orientation can influence temperatures. A part that performs beautifully in a large tower may become loud in a compact chassis because the fans sit close to panels or compete for the same limited intake. Choosing efficient CPUs and GPUs, using sensible power limits, and accepting a small performance trade-off can produce a much better daily experience.
Testing Method: Change One Variable at a Time
A clear testing routine prevents false conclusions. Start by recording idle temperature, room temperature, fan behavior, and noise impression. Then test a repeatable workload such as a game area, render, stress test, or file-processing task. Change only one thing before testing again: remove a front filter, open the side panel, adjust a fan curve, add an intake, reverse a top fan, or lower a power limit. When several changes happen at once, it becomes difficult to know what actually helped.
The side-panel test is useful but often misunderstood. If opening the panel causes a large temperature drop, the case airflow path is restrictive or poorly balanced. If the temperature barely changes, the issue is more likely cooler contact, cooler size, fan curve, component power draw, or unrealistic expectations. This simple test does not solve the problem by itself, but it points the investigation in the right direction.
Noise should be tested with the same seriousness as temperature. A system that is five degrees cooler but constantly distracting may not be better for the user. Listen for steady airflow, sudden ramping, bearing noise, vibration, pump hum, coil whine, and panel resonance. Rubber fan mounts, better curve smoothing, cable clearance, a frame-rate cap, or a small power limit can sometimes improve the experience more than another expensive cooler.
Maintenance That Keeps Performance Consistent
Dust control is easier when it is regular. Clean filters before they become blankets, and inspect heatsinks before temperatures rise sharply. A dusty intake changes the entire pressure balance because fans work against restriction. Compressed air should be used carefully, with fans held still so they do not spin freely. The goal is to remove buildup without damaging bearings, connectors, or delicate fins.
Thermal paste replacement should be done when there is a reason, not as a ritual every few weeks. If temperatures have worsened, the cooler was removed, the system is several years old, or contact looks uneven, repasting can help. Too much paste can be messy, while too little may leave uncovered areas. Even mounting pressure matters more than many people expect, so tighten coolers evenly according to the manufacturer’s instructions.
Seasonal changes deserve attention. A PC that behaves perfectly in winter may run louder in summer because room temperature sets the starting point for every cooler. If the room becomes warmer, the hardware has less thermal headroom before fans ramp up. Moving the PC out of a closed desk compartment, improving room ventilation, or cleaning filters before hot months can prevent problems without changing any internal component.
When Lower Power Is the Better Upgrade
Efficiency settings can be a serious performance tool. A modest undervolt or power limit may reduce heat and noise while preserving most of the real-world speed. This is especially useful for graphics cards and high-end processors that ship with aggressive boost behavior. The goal is not to make the system artificially weak; it is to remove waste that the user cannot feel but the cooler and power supply must handle.
Frame-rate caps are one of the simplest examples. Rendering 180 frames per second for a 144 Hz display may create extra heat without improving what the player sees. A cap near the useful refresh target can make fans calmer and temperatures lower. In some games it also improves frame pacing because the system stops chasing unnecessary peaks and spends more time in a stable range.
Power-aware tuning is also helpful for shared spaces. A PC in a bedroom, office, studio, or living room does not exist only as a benchmark machine. It affects comfort, conversation, sleep, recording quality, and concentration. A stable, quiet, efficient setup often feels more premium than a louder system that wins a benchmark by a small margin.
Final Cooling and Power Checklist
Before replacing hardware, verify the airflow route, fan direction, dust filters, cable clearance, cooler mounting, fan curves, component temperatures, power connectors, and room environment. Look for patterns instead of isolated numbers. A single high temperature during a synthetic load may not matter if the real workload remains stable, but repeated throttling during ordinary use deserves attention.
The best cooling and power setup is easy to maintain. You should be able to remove filters, inspect cables, reach fans, and clean the interior without rebuilding the whole machine. Reliability is not created only on the day the PC is assembled. It comes from choices that keep the system understandable months and years later, when dust, upgrades, and changing workloads begin to test the original design.
Real-World Cooling Scenarios
A gaming PC that runs cool in menus but becomes loud during matches is often responding to GPU heat rather than CPU heat. The owner should test a frame-rate cap, inspect lower-front intake, clean the GPU area, and watch whether the card’s fan speed rises sharply. If temperatures improve with the side panel open, the case may be starving the graphics card. If they do not improve much, the card’s cooler behavior, paste condition, power target, or fan curve may deserve closer attention.
A workstation that stays quiet for the first ten minutes of a render and then slows down is showing a sustained-load problem. Short tests may miss it because the cooler has not become heat-soaked yet. The solution might be a stronger CPU cooler, better radiator airflow, a more realistic power limit, or case exhaust that prevents warm air from collecting near the top of the chassis. Long workloads need long tests because the thermal story changes after the system reaches equilibrium.
A compact build that sounds harsh even at moderate temperatures may be suffering from turbulence, panel restriction, or small fans spinning too quickly. The numbers may look safe while the sound remains irritating. In that case the fix may be a different fan curve, smoother intake path, lower power limit, higher-quality slim fans, or a component choice that creates less heat in the first place. Small systems are not judged only by temperature; they are judged by whether the acoustic character is tolerable at the desk.
Cooling Myths That Create Bad Builds
One myth says that more fans automatically means better cooling. Extra fans can help, but only when they improve the path of useful air. Fans that fight each other, pull air away from a cooler, or add turbulence near a restrictive panel may raise noise more than they lower temperature. A simple, directed layout often beats a crowded layout that looks impressive in photos.
Another myth says that liquid cooling is always quieter than air cooling. A good liquid cooler can handle heavy CPU loads very well, but it also adds pump noise, radiator placement concerns, and more installation variables. A quality air cooler can be quiet, reliable, and easier to maintain for many builds. The better choice depends on CPU power, case layout, room temperature, noise expectations, and how much maintenance complexity the owner is willing to accept.
A third myth says that low temperatures are always worth chasing. Hardware needs to stay within safe operating ranges and avoid throttling, but shaving a few degrees at the cost of constant noise may not improve the user’s experience. A stable, quiet system at reasonable temperatures is usually better than a loud system that wins a temperature contest. The goal is useful consistency.
Safety Notes for Power and Cooling Work
Always shut the system down and disconnect power before moving internal cables, replacing fans, changing coolers, or reseating components. Pressing the power button after unplugging can help discharge some residual energy, but it does not turn careless handling into safe practice. Work slowly, avoid static-prone environments, and keep screws organized so none are left loose inside the case.
When working with coolers, support the motherboard and avoid forcing screws at an angle. Uneven mounting can reduce contact and create worse temperatures than the old setup. When working with power cables, make sure connectors are fully seated without extreme bending at the plug. High-power connectors deserve room, patience, and inspection because a partially seated connection can become dangerous under load.
Liquid coolers require special attention to radiator placement, tube routing, and pump connection. The pump should receive the correct header behavior, and tubes should not be kinked or pressed sharply against panels. If a cooler makes unusual grinding or gurgling sounds, investigate rather than ignoring it. A quiet cooling system is not only about comfort; it is also a sign that parts are working within their intended conditions.
Reader-Friendly Summary
Cooling and power stability are not separate afterthoughts. They decide whether the CPU, GPU, memory, storage, and motherboard can behave consistently during real work. A good system has a clear airflow route, sensible fan curves, clean filters, reliable power delivery, safe cabling, and enough thermal headroom for the tasks it performs every day.
Do not solve heat by guessing. Observe the symptoms, test one variable at a time, and connect the fix to the cause. The best PC is not the coldest or loudest machine possible. It is the one that stays stable, comfortable, and easy to maintain long after the first benchmark run is over.
Extra Checks for Quiet Reliability
Look for vibration paths as carefully as temperature paths. A fan that is technically working can still transfer a low hum into a thin side panel, desk surface, or loose bracket. Tighten panels gently, confirm that fan screws are secure, and keep hard drives or pumps from touching surfaces that amplify sound. These small mechanical fixes rarely appear in performance charts, yet they can make a powerful PC feel far more refined during ordinary use.
Also review where the computer sits. A tower pushed against a wall, placed on thick carpet, or trapped inside a cabinet can recycle warm air even when the internal fan layout is sensible. The case needs breathing room around its main intakes and exhausts. Moving the system a few centimeters, lifting it off the floor, or opening the back of a desk compartment can sometimes lower noise more than another internal fan.